We use cookies to make your experience better. To comply with the new e-Privacy directive, we need to ask for your consent to set the cookies. Learn more
Uberti's Guide to Black Powder Revolvers

This guide is courtesy of Uberti, and is their manual for owning and operating their range of Black Powder revolvers, specifically Colt and Remington patterns. Our full range of Uberti revolvers can be found here.
Please note Henry Krank & Co. accept no liability for personal injury or damage caused by following this data, it is used entirely at the shooter's own risk. This information forms no part of a contract.
WARNING - Please read carefully this guide before using or handling your revolver!

General Hints and Precautions
Uberti Black Powder revolvers are faithful replicas of original models and maintain their design and mechanical features. They are different, of course, from modern cartridge firearms in operation and loading. Anybody using these guns must know that improper handling must be absolutely avoided, so that no harm may result. This is, after all, a general rule for any firearm. Following precautions should always be followed for safe use:
- Always treat a gun as if it is loaded.
- Use black powder only, without exceeding the recommended maximum powder charges.
- Be sure that the ball is firmly seated on the powder charge before firing.
- Do not fail to lubricate the chambers of the loaded cylinder with suitable grease, in order to prevent chain fire.
- It is a good practice to load only five chambers of a six-shot revolver, and to carry the gun with the hammer resting on the nipple of the unloaded chamber. For better safety, block the cylinder by placing the hammer onto any of the intermediate positions between the chambers on the cylinder rear face (see: Loading and Shooting).
- Never climb or jump any obstacle with a loaded revolver in your hand.
- Never smoke when loading or shooting your firearm, or when handling black powder in any way.
- Protect your eyes and ears when shooting.
- Never point muzzle of barrel towards yourself or anybody else. Be sure of your target and that everybody is behind you when firing.
- Make sure that your gun is unloaded before storing it. Always store guns, powder and caps in separate and dry places.
- Treat a misfire or failure to fire as though the revolver can fire at any time.
Black Powder
- Black Powder is the only safe propellant for use in any muzzle loading firearm.
- Always be sure to employ commercially manufactured Black Powder for use in muzzleloaders, with proper granulation. Warning: Use of smokeless powder in any muzzleloader revolver will result in excessively high pressure and can cause serious damage to the firearm and possibly to the shooter.
- Black powder should be stored in a Black Powder Storage Box.
Projectiles
- The recommended projectile to assure the greatest accuracy and consistency is a round ball (cast or swaged) of pure lead.
- Conical bullets, originally used to provide greater knock-down power, are not so accurate as round balls, primarily because during loading they become canted and therefore enter the bore at an angle.
- Do not exceed the maximum recommended black powder charges or change powder granulation when using these bullets.
- Pull the hammer back to full cock position and you are ready to fire.
- After firing all the chambers, wait one minute to reload. This allows all remaining sparks to burn out prior to reloading.
Preparation before loading
- The revolver must be cleaned prior to loading, to remove the applied preservative.
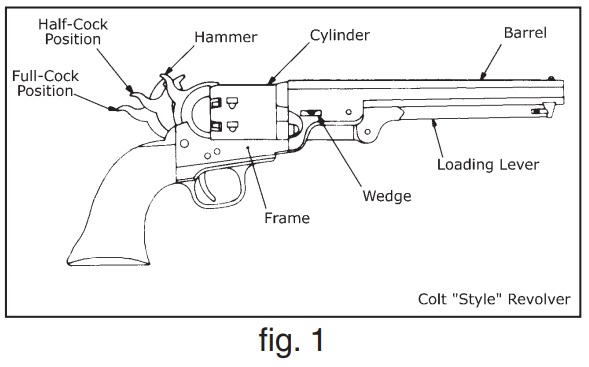
- Disassembly of the Colt-style revolver (see fig. 1):
- Remove the wedge, located just forward of the cylinder, by tapping it through the slot from the right side of the barrel.
- Place the hammer in the half-cock position (first audible 'click').
- Rotate the cylinder, so that the loading lever, when lowered, will hit the area between the cylinder chambers. This allows the loading lever to help in removal of the barrel from the frame and cylinder pin.
- Remove the cylinder from the frame.
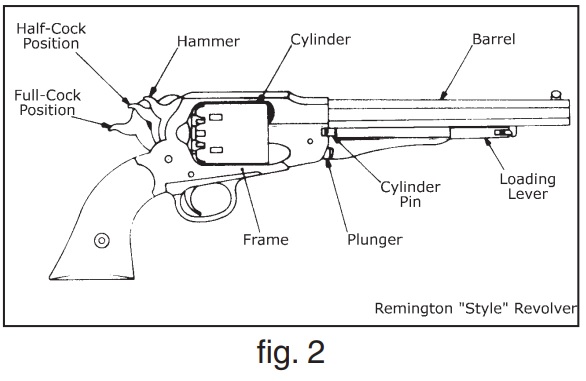
- Disassembly of the Remington-style revolver (see fig. 2):
- Partially lower loading lever so that plunger does not enter cylinder chamber.
- Pull out the T-shaped cylinder pin.
- Place the hammer in the half-cock position (first audible 'click'). Cylinder will rotate out of the frame.
- Clean the interior of all cylinder chambers by using a cotton swab dipped in a cleaning solvent.
- Place the cylinder so that the chambers face down for easy draining.
- Run a cleaning patch soaked with solvent through the barrel.
- Run clean and dry swabs and patches into the chambers and through the barrel for thorough cleaning.
- During reassembly, oil all moving parts and grease the grooves of the cylinder pin. Note: If you are going to start shooting within the day, do not oil the inside of chambers or nipples.
- Once the projectile has been seated in each of the chambers, grease patch should be placed over and around the ball and opening of each chamber.
- A light gun oil should be used to lubricate all moving parts. Do not apply oil heavily, in order to avoid additional fouling during shooting and more cleaning between shots.
 |
 |
 |
Loading and Shooting
- Put on your shatterproof shooting glasses and insert ear plugs, as a black powder revolver may shower sparks or bits of cap when fired.
- Be sure revolver is unloaded.
- Place hammer in the half-cock position.
- Rotate the cylinder to see that all the nipples are void of percussion caps. Remove any percussion caps immediately.
- Take a wooden dowel or cleaning rod and place one end down the barrel and mark rod at muzzle. Be sure the chamber is in line with the barrel.
- Remove rod and lay along outside of barrel, lining-up mark at muzzle. The opposite end of the rod should end at the nipple, where the chamber ends. Repeat for the remaining five chambers. This practice will assure that the gun is apparently obstructed and should be disarmed before proceeding.
- Set the hammer at half-cock position and check that revolver cannot be fired (i.e. that the hammer cannot be moved) when trigger is pulled. Half-cock refers to the notch which allows the hammer to rest above the nipple, thus preventing the revolver from firing when trigger is pulled.
- With gun pointed in a safe direction, place a percussion cap on each nipple. Turn the cylinder so that a nipple aligns with the cut-out on the right side of the frame, angle muzzle downward. It may be necessary to pinch the cap to assure a snug fit on the nipple. Note: It is important to employ caps of the right size, it is good practice to use a capper to place caps onto nipples, in order to avoid explosion under excess finger pressure.
- Fully cock the hammer and fire each cap to dry out the base of the chamber and nipple. Repeat this procedure for all six nipples to ensure the chamber is thoroughly dry.
- Check to be sure no unfired caps have been accidentally left on the nipples.
- Place hammer at the half-cock position.
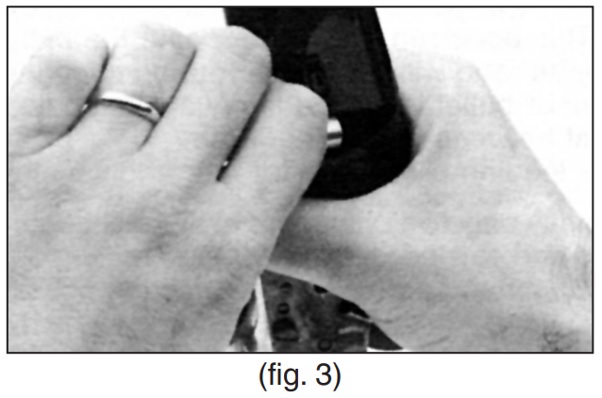
- Hold the muzzle up, with right side toward you. Be sure no part of the body is over the revolver. Pour a measured charge into the chamber closest to the loading cutout (see fig. 3). Repeat this procedure for other chambers.
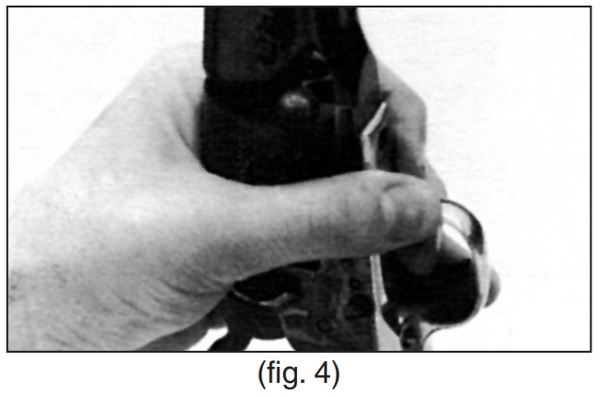
- Place the proper-sized ball or bullet on the opening of the chamber. The ball or bullet should be oversized, so it will not enter (see fig. 4). If cast balls are being used, place sprue (or flat portion) facing upward.
- Rotate the cylinder to place ball directly under the plunger of the loading lever.
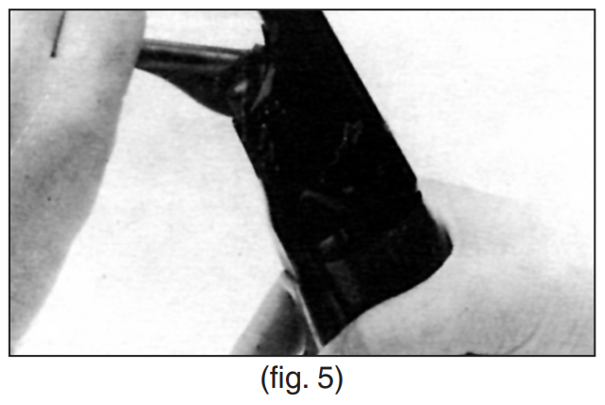
- Unlatch the loading lever and with smooth, even pressure, seat the ball firmly on the powder, but without crushing the powder (see fig. 5). A thin ring of lead will be shaved off the ball by the opening of the chamber. This occurrence illustrates that the ball is properly fitted to the chamber and will not loosen during shooting. Be sure ball or bullets is seated firmly against powder. No air space should exist between ball and powder.
- Repeat this loading procedure for four additional chambers.
-
- Note: Normally only five chambers of a six-shot gun are loaded. The gun is used and carried with the hammer resting on the nipple of the unloaded chamber. To do so will reduce the possibility of any accidental firing. All Colt and Remington-style revolvers are provided with intermediate pins or slots between the single chambers on the rear face of cylinder. By engaging the hammer to such pins or slots, cylinder is prevented from rotating and accidental firing can be avoided
- Note: The grease reduces the possibility of a chainfire: that is when the flame from the first-fired chamber crosses over and causes the other chambers to fire at the same time (see fig. 6)
-
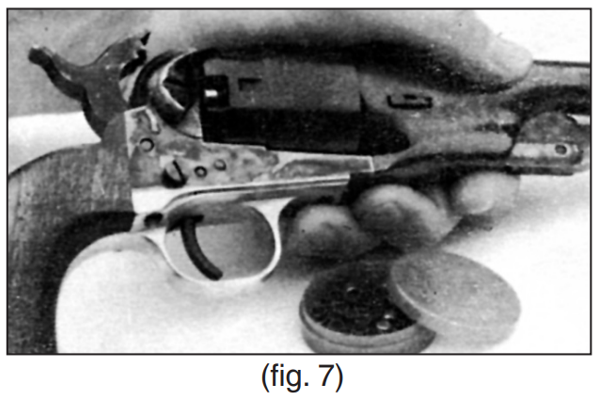
- With the gun pointed in safe direction and hammer in half-cock position, place a percussion cap on each of the loaded chambers. The guns is now loaded (see fig. 7).
- Pull the hammer back to full cock position and you are ready to fire.
- After firing all the chambers, wait one minute to reload. This allows all remaining sparks to burn out prior to reloading.
 |
 |
 |
Malfunctions
- If a misfire or failure to fire occurs, wait at least one minute with gun pointed at the target. After the other chambers have been fired.
- Place hammer in half-cock position.
- Rotate the cylinder and remove the cap from nipple of the misfired chamber.
- Push a nipple pick through the hole in the nipple into the main charge to clear away any possible obstruction.
- Seat a new cap and re-fire that chamber.
- If the gun still does not fire, wait one minute with gun pointed at target. Note: If cylinder with loaded chamber must be removed, be sure all (unfired and fired) caps have been removed from the nipples. It is possible for a chamber to fire even though not in the gun. This could cause serious damage to the shooter.
- Place hammer in half-cock position and remove all caps.
- Remove cylinder from gun.
- Use a nipple wrench and remove the nipple of the unfired chamber.
- Clean the nipple thoroughly and dry it completely.
- Push a nipple pick through the nipple hole of the cylinder to loosen the powder at the rear of the chamber.
- Pour fresh powder into the nipple hole.
- Reinsert and tighten nipple.
- Replace cylinder in gun.
- Place new cap onto nipple.
- With gun pointed in safe direction, pull hammer to full cock position, and you are ready to fire.
- If gun still does not fire, remove cylinder and nipple, soak the cylinder in hot water to flush out the powder and push the ball or bullet out from the rear of the chamber (nipple hole end), using and aluminium, wood or brass rod.

Cleaning and Maintenance
- Black powder fouling is extremely corrosive and can rust the barrel and cylinder in a short time. All black powder guns must be thoroughly cleaned after firing is completed.
- Completely disassemble the gun.
- Wipe off the grips.
- Soak all metal parts in hot water and dish detergent and wipe off the fouling, or use a brush and black powder solvent, to scrub off the fouling.
- Rinse all the metal parts in boiling hot water, then thoroughly dry.
- When cooled, wipe all parts with a rust preventative; lightly oil moving parts, grease grooves of cylinder pin and reassemble.
- Store firearms in a dry place with sufficient ventilation.


